With the wiring taken care of it and all the steps to get this point covered in my previous posts:
- Tronxy x5SA-600 Klipper Conversion Part 1 – The Exciting Bit – Buying Parts
- Tronxy X5SA-600 Klipper Conversion Part 2 – The Scary Bit – Rewiring
- Tronxy X5SA-600 Klipper Conversion Part 3 – The Anxious Bit – Octopus Pro Hookup
It was now the moment of truth and time to power up Frankentronxy Spaghetti Monster and install firmware.
The Plan
The plan was simple. With all this being new to me, I didn’t want to compile / build my own firmware so I planned to use the firmware that was available from BigTreeTech. So what I imagined I would be doing was:
- Use the BTT image of Klipper from the BTT Octopus Pro GITHUB repository and install it to the Octopus Pro
- Install MainsailOS to the Raspberry Pi using the Raspberry Pi installer
- Use the sample Printer.cfg with a few amendments to get going and update it as i need
- Test each individual component to make sure they work, before trying them together as a system
Reality
The reality is that while the order was somewhat correct, it’s a very nuance process had me banging my head at the wall in frustration at times
Installing Klipper Firmware
This was my first point of frustration. The firmware link on the Biqu website doesn’t point to the Octopus Pro repo, but instead to the Octopus repo. In this repo is a folder name Klipper which has pre-compiled firmware for the Octopus Pro. These 2 boards are very much alike, so I guess it was easier for them.
I renamed the chosen file to firmware.bin exactly as it said in the instructions (all lowercase) copied it to a freshly formatted 8Gb SD Card and inserted it into the Octopus Pro SD Card slot. Then I waited for a couple of minutes before switching it all of and removing the card.
If the process was successful, the firmware on the card will be renamed to firmware.cur to show that this is the current firmware file and has been successfully installed. But I got nothing.
I went through a few iterations of trying to get this working with no success. Finally I realised I needed to remove the BOOT0 jumper from the Octopus Pro motherboard to allow it to take firmware updates. I covered the location of this in Part3 of my journey.
With the Jumper now removed I was pleased to see the the firmware file was being renamed to firmware.cur indicating that I now had Klipper installed on my Octopus Pro.
I discovered later on however, that this version of Klipper is not compatible with the latest version of OctoPi.
Now I should point out, that while I am using Mainsail OS as the operating system now, I did initially run Octopi OS. Octopi is a fork of the original Octoprint operating system with the additional Klipper software pre-installed to make it easier for people to get started. And Octoprint is best described as an Raspberry Pi Operating System that provides a web interface for controlling and monitoring 3D prints. I was previously using this with Marlin.
So I had to build my own to make it work. But before I could do that I had to install OctoPi onto a Raspberry Pi computer.
Installing Octopi
I have a second Raspberry Pi lying around that I use for my home automation setup. I didn’t want to mess about with the Raspberry Pi I had connected to the Octopus Pro board, so I used that one to install Klipper. Raspberry Pi computers run everything off an SD card so there was no risk of damaging my home automation setup as long as I used a new SD card.
So, to install the Octopi Operating System:
- Download and install the Raspberry Pi imager on a PC or Mac (I did this on my Mac, but the instructions are the same) from https://www.raspberrypi.com/software/
- Insert a new SD card into your PC. Note that anything currently on this SD card will be obliterated!
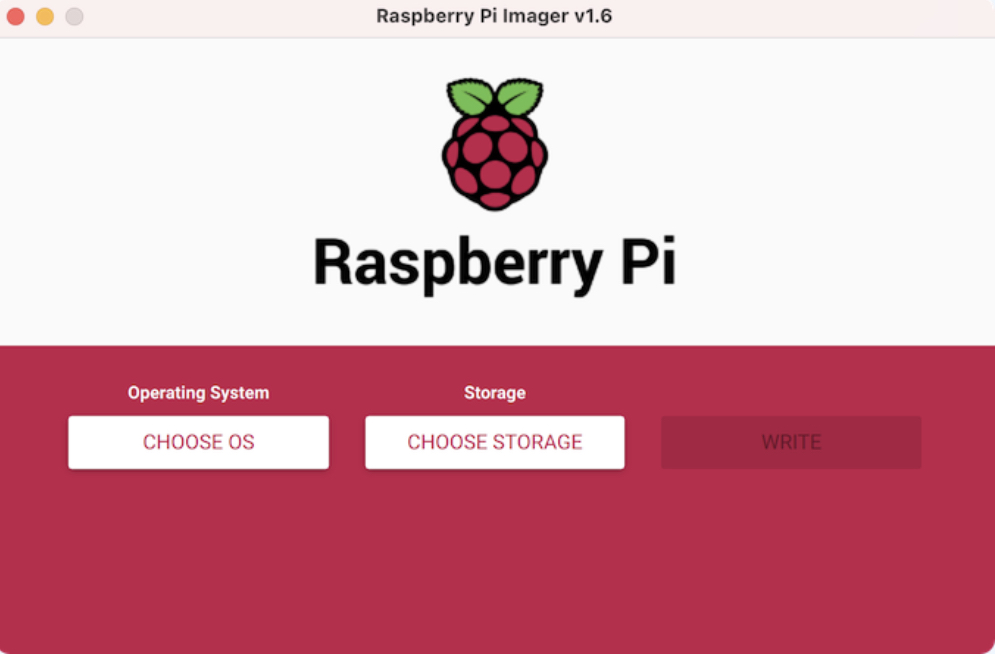
- Run the Imager app and you will see a window similar to the following:

- From the Operating System dropdown select ”Other specific purpose OS” then “3D Printing” and “OctoPi” and then select ”Octopi (stable)”
- From the Storage dropdown, select the SD card that you inserted into your computer
- Click on the small gear icon on the bottom right corner of the window. On a Mac you will be prompted ”Would you like to prefill the wifi password from the system keychain”. I imagine on windows a similar prompt will be presented. In any case select Yes, to prefill your wifi details.
- Check the Set hostname option and select a name for your Octopi instance. This is the URL you will be using to accessing the web front end.
- Check the enable SSH option as this is needed to build the Klipper firmware.
- Set a password for the Pi user and change the username if desired.
- Click Save to save your changes
- Back on the main window, click on “Choose Storage” and select the SD card.
- Click “Write” and the Raspberry Pi Imager will download and install the OctoPrint image. This takes a 5-10 minutes to complete.
- Remove the SD card from your PC and insert it into the Raspberry Pi (with power switched off)
- Power up the Raspberry Pi and give it a few minutes to start up and run the first-run setup scripts. I suggest leaving it for a good 5 minutes.
The Klipper firmware can now be compiled.
Compiling Klipper Firmware
Compiling Klipper Firmware is actually quite simple once the Raspberry pi is set up and requires no knowledge of coding (but having that knowledge definitely gave a level of comfort while doing this). This process can also be done on any PC that has Python installed.
I followed the instructions on in section 3 of ”Build Firmware Image” on the Octopus GITHUB Klipper page and found them to be quite concise. Here is what I did.
- Open a Terminal window on your PC or Mac
- From the Terminal window run the following command to connect to the Raspberry Pi shell:
ssh pi@octopi.local - You will be prompted for a password for the pi user
- Run the following command after connecting to the Raspberry Pi:
git clone https://github.com/Klipper3d/klipper
./klipper/scripts/install-octopi.sh
This will pull the latest version of the Klipper source code to your PC - Run the following command build the source code configuration file:
cd ~/klipper/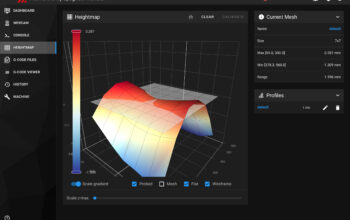
make menuconfig - This will start the Klipper configuration and present you with a screen similar to this:

Navigate using arrow keys and use space bar to select options. Note that these screenshots were taken off my iPad and the screen colour might be a bit different to what is viewed on a PC or Mac. - The first thing to do is select the option at the top
Enable extra low level configuration option
This will enable extra options that we need to compile the code to the Octopus Pro board that looks like this
- Navigate to Micro-controller Architecture (Atmega AVR) and change this to the STM32F429 (or whatever chip your Octopus Pro has)

- This should automatically set the Processor speed. 8Mhz for the F429, 12Mhz for the 446
- Select the communication interface to USART2 PD6/PD5

- The Baud rate and and GPIO options do not need to be changed. Type Q to quit the configurator and Y when prompted to save the config:

- You will be returned to the terminal screen. Run the following command to compile the source code:
make - It will create a file named klipper.bin in the
./outfolder - Type
exitto quit the SSH session and return to the Terminal of your local PC - Copy the firmware to your local PC by running the following:
scp pi@mainsail.local:~/klipper/out/klipper.bin ~/Downloads
Note, that this command worked on my Mac. On windows is may be different. - Rename klipper.bin to firmware.bin and copy it to the root of a new SD card. I used the 8Gb card that shipped with my Tronxy and have read anecdotally that it’s best to use a small card. I can’t see why this would be the case though.
- Insert the SD card into the Octopus Pro card reader then Power Up the Octopus Pro. The firmware should be written in a few seconds, but leave it a good 5 minutes to be sure.
- Shut it down and pull the card. The firmware file should be renamed to
firmware.cur
Installing Mainsail OS
Installing Mainsail OS is very much the same as installing Octopi. But I found that Mainsail needed a bit of tweaking before it actuallty worked, whereas OctoPi worked straight out of the box.
When I say working, I’m not talking about 3D Printer functionality, I’m talking about actually being able to connect to the printer so that I could start testing things out.
- Download and install the Raspberry Pi imager on a PC or Mac (I did this on my Mac, but the instructions are the same) from https://www.raspberrypi.com/software/
- Insert a new SD card into your PC. Note that anything currently on this SD card will be obliterated!
- Run the Imager app and you will see a window similar to the following:
- From the Operating System dropdown select ”Other specific purpose OS” then “3D Printing” and “Mainsail OS” and then select ”Mainsail OS”
- From the Storage dropdown, select the SD card that you inserted into your computer
- Click on the small gear icon on the bottom right corner of the window. On a Mac you will be prompted ”Would you like to prefill the wifi password from the system keychain”. I imagine on windows a similar prompt will be presented. In any case select Yes, to prefill your wifi details.
- Check the Set hostname option and select a name for your Octopi instance. This is the URL you will be using to accessing the web front end.
- Check the enable SSH option as this is needed to build the Klipper firmware.
- Set a password for the Pi user and change the username if desired.
- Click Save to save your changes
- Back on the main window, click on “Choose Storage” and select the SD card.
- Click “Write” and the Raspberry Pi Imager will download and install the OctoPrint image. This takes a 5-10 minutes to complete.
- Remove the SD card from your PC and insert it into the Raspberry Pi (with power switched off)
- Power up the Raspberry Pi and give it a few minutes to start up and run the first-run setup scripts. I suggest leaving it for a good 5 minutes.
- Mainsail OS is now installed and you can connect to it by typing the hostname into your browser:
http://mainsail.local - It should connect but will probably show an error connecting to Moonraker
But Mainsail OS Is Not Without Bugs
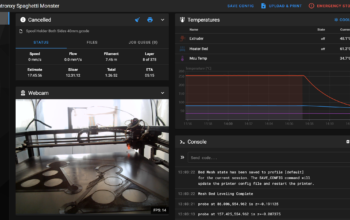
I was relieved that I had managed to install Mainsail and get this far, but as implied above, I was getting an error on the Mainsail landing pagethat looked something like this:

What’s happening here is that there are effectively 3 layers of software in the Klipper architecture:
- Mainsail OS – This is effectively the UI that we interact with to use Klipper
- Moonraker – This is the underlying API that allows the UI in Mainsail OS communicate with the Klipper firmware
- Klipper firmware – This is the software installed on the 3D Printer that controls the movement of the machine.
So what this error is telling us, is that Mainsail OS can’t connect to Moonraker and therefore has no chance of communicating to Klipper. Luckily for me, I have a bit of experience with Linux and debugging code (my day-job is in IT as a Business Intelligence Consultant, so over the last 25 years I’ve spent a lot of time looking at code).
It turned out that there were 2 issues at play, both identified in ~/klipper_logs/moonraker.log. Both were rather simple to fix as it turns out:
- Moonraker.conf is installed in the wrong folder on MainsailOS when installed through the automated installer. I found this error by looking in the Moonraker.log file and found something similar to this:
confighelper.ConfigError: Configuration File Not Found: '/home/pi/printer_config/moonraker.conf''The Mainsail OS is looking for moonraker.conf in a folder named printer_config, but it comes shipped in the folder klipper_config. To fix this I created a printer_config folder and moved the moonraker.conf file. From the klipper_config folder I entered the following commends:mkdir ~/klipper/printer_config
mv moonraker.conf ~/klipper/printer_conf/moonraker.conf
- The IP address of PC / Mac / Device you are connecting to Mainsail from needs to be explicitly set in the config. This error looked like this:

To fix this error I need to edit the moonraker.conf file to allow my IP subnet using IPV6 addresses (Highlighted in yellow below):
I’m aware that there’s some redundancy in those lines and I should probably clear out the others, but I’m not too concerned with that. If someone were to get this far into my home lan, I’ve got much bigger problems than my 3D printer.
And so with that I was able to connect to Mainsail, Moonraker and connect to the Printer.
This meant I was now ready to try my printer.cfg file.
Octopus Pro printer.cfg file settings for use with Tronxy X5SA-600
My current printer.cfg file is on Github. I try to keep this up to date as much as possible.
I started off with the printer.cfg file that shipped with the Octopus pro, and tested things systematically. My approach was to power up the printer, stand on guard near the power switch (in case anything goes up in smoke or I’m not comfortable with) and send a command to each component.
First the X-Axis movement, followed by Y, then Z. If anything moved the wrong way, I’d update the printer.cfg and try again. If a motor crashed into the frame or the print head went into the bed, I’d switch it off from the mains, tweak the cfg and try again.
After I got the 4 stepper motors working, I repeated the same with the end stops. Then the hot-end and extruder followed by the heat bed.
This was really a case of trial and error and looking up other similar printers and hoping they had the same values. There were other Tronxy printers defined in the klipper sample config files, so I assumed in many cases that they used the same hardware, but this wasn’t always the case.
It was never a case of having the wrong pin, however, as the Octopus Pro pinout diagram in the github repository is very clear to read. My problems were usually resolved by having to reverse the pin using an ! in front of the pin name or adding a ^ (referring to a pullup resistor) in front of the end stops. Other tweaks I needed to make include updating the microsteps, rotation_distance and full_steps_per_rotation settings on the stepper motors and increasing the current on the Z motors.
Of course, it didn’t end there. At this point I had a functioning machine, but I still needed to calibrate everything. I’ll cover that in my next entry.

thank you for your explanations
I have a tronxy x5sa-400 and I bought a BTT octopus pro.
i didn’t know how to create the cfg file now i understand. this will help me a lot.
Hi!
Thanks for this great manual, I am also on the way to convert my X5SA Pro to Octpus Pro / Klipper.
In your printer.cfg, I see:
[printer]
kinematics: cartesian
Doesnt this need to be corexy instead of cartesian?
Do you use endstop switches for Z? If yes, one or two? And in which bed position do they trigger? I had the idea, that the BLTouch will manage syncing the two Z-steppers on start, how does this work together?
Thank again for the informations!