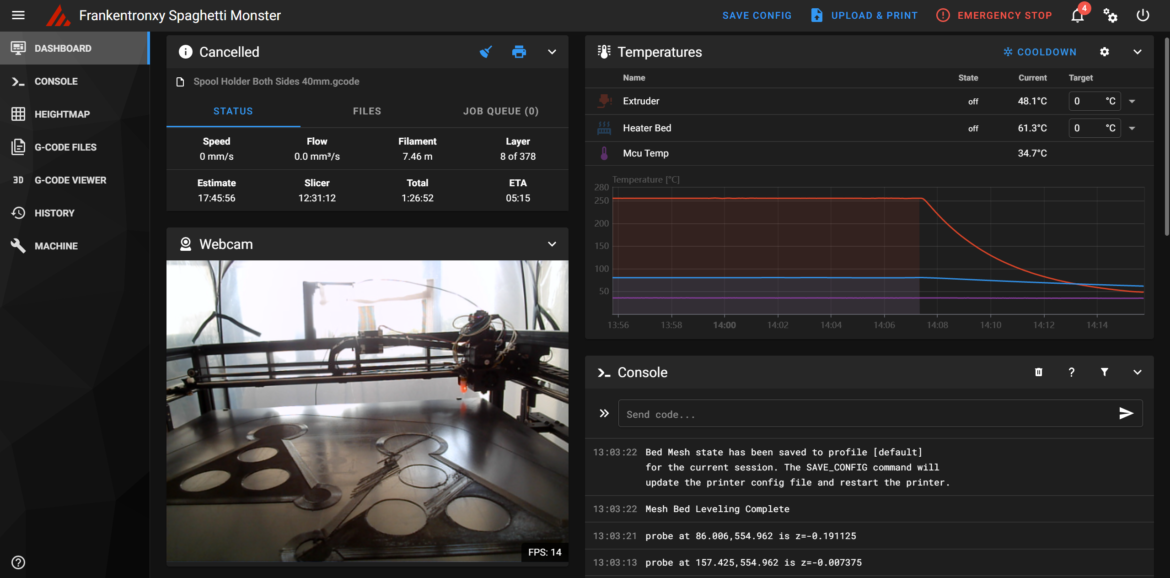
It’s been a little over a month now since I got Klipper up and running and while I did manage to initially get a few good prints, it’s now been several weeks since I’ve been able to complete a print from end-to-end.

I’ve probably gone through the whole myriad of 3D printing issues over these last 4 weeks and in many cases I’ve just been throwing new parts at it to try to resolve while also upgrading my printer. The main issues I’ve gone through are:
- Bed won’t heat
- Extruder jams / Temperature Spikes
- Layer shifts
- Prints lifting off the bed / Bed adhesion
I should point out, that none of this has been because of Klipper or the Octopus Pro motherboard. Klipper itself has been running flawlessly and all the issues I’ve had have been of my own doing. So let me start from the beginning.
Bed Won’t Heat
This was one of the first issues I faced. The original Tronxy motherboard was able to heat the bed and the extruder by directly connecting them to the mother board. I was hoping that since the Octopus Pro was an upgrade it, that it too would be able to heat both the bed and extruder with no additional hardware. Unfortunately this was not the case. I added an MOSFET board in between the Octopus Pro and the bed and this resolved it – except that it appeared that the cheap MOSFET board that I bought failed after a few days. So I replaced the board and it was heating again without any issues.
Extruder Jams
This one was purely user error – but it led to a series of upgrades over the following weeks.
I had correctly set the Z endstop offset in my initial configuration, but what I didn’t know is that it is not necessary to set the probe offset. Rather the relative_reference_index setting in the printer.cfg file tells Klipper to use one of the probed points generated during bed levelling as the probe z offset.
[bed_mesh]
speed: 200
probe_count: 8, 8
horizontal_move_z: 12 #this must be higher than probe z_offset
algorithm: bicubic #lagrange
mesh_min : 40, 40
mesh_max : 540, 560
mesh_pps: 0
relative_reference_index: 1
In this case, I’m telling it to use the first probe point as the probe z offset. I’m still not sure that using the first probed point is ideal but it’s definitely working better than it was before including that setting.
I’ve also recently switched to taking the z endstop offset from the centre of the bed instead of the home position. I’ve done this for 1 reason – This is effectively the pivot point of the bed since the lead screws are at this position. So anything that causes the bed to move when it shouldn’t (eg when removing a piece off the bed or applying pressure to the bed when cleaning) should be relative to this point.
This is also why I feel that I should change the relative_reference_index above from 1 (being close to the home position) to somewhere around 31-32. Note that I’m also using an 8 x 8 mesh for probing, so I have 64 probed points. This printer does have a 600x600mm bed afterall.
So what does all this have to do with extruder jams? Well, with the incorrect probe offset, what would happen is that the nozzle wouldn’t correctly compensate when travelling around the bed for the difference in bed height (note also that I have over 1mm difference between the centre of the bed and the outer edges). so in some places it would be to high leading to adhesion issues and in other areas it would drag along the bed. This prevented filament from coming out, leading to heat creep – and BAM! -extruder jam!
And wouldn’t you know it this lead me down a massive rabbit hole of upgrades and part switching.
Firstly when I was trying to clear the jam, I managed to break my heat break in 2. Luckily there’s a 3D printer shop that opened the next suburb over so I went there to buy a new one. As luck would have it, they sold they’re own volcano clone extruder complete with heat sink, heat cartridge and PT100 thermistor for only $22. I figured I’d buy this and have a bunch of spares. Wrong!
The Tronxy flavoured volcano uses a different heat break to a genuine E3D and also this new clone. So that meant I had to replace the entire extruder. Not a huge job since I did this upgrade with part swapping in mind. I had JST connectors close to the hot end to make switching easy. So I undid everything and cut / crimped / soldered / joined wires where I needed.
Turn it on, and no matter what I did I just couldn’t get the PT100 to work. And yes I did plug it into the correct MAX31865 port and configured my printer.cfg file correctly. I must have spent the best part of 3 days on this before giving up and buying a regular 104GT2. And finally, success!
Until I tried printing. My extruder reached temperature correctly and the print would start perfectly. Then about 30-60 minutes in, I’d get an error that the extruder is not heating at the expected rate and the whole thing would shut down.
I checked all my wiring and it all seemed to be OK. Now I won’t go into detail here, but I spent at least 2 weeks trying all sorts of workarounds / debugging / testing with no success.
Finally in my frustration, I decided I was going to replace the Heat cartridge and my thermistor. But what the hell, I’m going to upgrade my entire extruder as well. So I did my research and settled on a Phaetus Dragon UHF. There was a local distributor that could post it to me in a couple of days.
Enter the Dragon – Phaetus Dragon UHF
The Phaetus Dragon UHF is a beautiful looking thing and fits right where a regular V6 style extruder fits.

It is slightly longer than the volcano, but that’s easy to fix adjust with my Z offset. So I ordered it along with a new heater cartridge, PT100 thermistor and another NTC100K thermistor in case I still couldn’t get the PT100 to work.
Fortunately the PT100 did work this time around and so I hooked it all up and started printing.
And it failed! After a while I would get the opposite problem to what I was previously experiencing. The temperature would start spiking upwards to the point where I was getting over temperature errors.
So, could the problem have been something I’ve done? Surely not!
OK, so it looks like the problem was one of 2 things:
- The JST connectors were not a good idea (even though the PT100 almost always has a JST connector on the end)
- Running the thermistor wires through the same cable chain as the rest of my hotend wiring is introducing noise in the circuit and causing this temperature spikes.
So I decided to pull all my old thermistor wiring out and run a new single piece wire from the motherboard to PT100. There is now only 1 join using solder connectors and instead of running the wire through the middle of the cable chain, it now is cable tied to the outside. It’s not elegant or pretty, but damn it, it works.
Finally after all of that I was able to print with no temperature spikes.
Layer Shifts
In the middle of the Extruder kerfuffle, I came across another problem. I was starting to get massive layer shifts on almost every layer of my prints in the Y axis.
This turned out to also have been caused by me. When I was tightening he gears onto the Y axis rod on the Tronxy, I had overtightened grub screws and stuffed the threads. So when the printer would change directions on the Y axis it would almost always miss a few steps or more.
You’d think this is easy to spot, but it’s not easy to tell how much the shiny Y axis rod is spinning during printing.
Now I tried to order new gears, but I couldn’t find the right size locally and it would take over month to get new ones from China. This is where my car repair knowledge came in useful. Rather than change the gears, I would just drill out the thread, tap a new thread in and insert a helicoil. Then I could just use a regular screw to tighten the gear to the rod.

Doing this, I could now tighten the gear into the rod much firmer than I ever could with the grub screws.
But this hasn’t been the exclusive cause of my layer shifts. I am also experiencing filament tangles as it comes off the reel. This is causing the filament to knot itself and jam before it makes it to the extruder and causes the layer shifts.
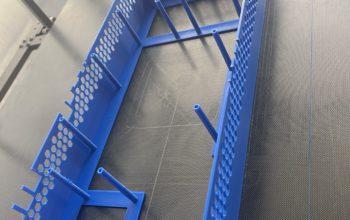
This is quite ironic when you consider I’m actually trying to print spool holder capable of holding a 2Kg reel of PETG specifically to get around this issue. I may have to go back to using 1Kg spools until I can finish the spool holder.
Bed Adhesion
Bed adhesion has also been causing me a lot of grief. There’s multiple causes of this, but ultimately I managed to resolve it via 2 fixes:
- Levelling the bed
- Cleaning the bed
Levelling the bed
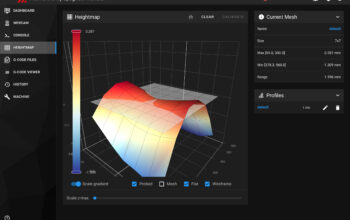
I touched on this earlier when talking about my extruder jam issues. By not having proper defined Z offset, a level bed and a proper bed mesh defined the printer is unable to lay down the filament consistently. This is going to lead to problems with the print lifting off the bed or not sticking to the bed in the first place.
Cleaning the bed
Since I was having all sorts of issues with adhesion, I went to Google to try and find a solution. And what useless rabbit hole that lead me down:
- Try rubbing a glue stick on the bed
- Try a 50/50 mix of PVA glue and water
- Try increasing the bed temperature
- Sugar syrup on the bed
- Clean the bed with isopropyl alcohol
Yes I was desperate enough to try the sugar syrup after a friend advised it. What I found was that every one of these suggestions (except perhaps the isopropyl alcohol) did nothing but make a mess. Bed adhesion was not improved at all.
None of this made near as much of a difference as cleaning the bed with good old tap water!
My method is to warm the bed to around 80 degrees then give it a good wipe with a damp / wet paper towel. I’d then use a second paper towel to wipe off the mess. This was especially important when I was trying to clean off the glue.
It’s important to note that the Tronxy uses a glass bed. I have no idea whether other build surfaces react differently with the suggestions above.