I’ve taken quite a long break from using the Frankentronxy Spaghetti Monster, partly because I’ve been busy with other things, but also because using it is never a straightforward process. One of the biggest problems is getting the first layer down. This is how I get the perfect first layer with Klipper.

While I do occasionally get a nice print out of it, it usually takes about 10 goes to get it right and is very time consuming. A few months ago I was chatting with my friend Bryce (shout out to Classic Jalopy, which has a ton of useful info on repairing 1970/80’s era Mercedes Benz cars) and he mentioned he needed some new speaker surrounds 3D printed. Naturally I was happy to help, but I knew it wasn’t going to be a simple task, even though it should have been.
Get the perfect first layer with Klipper
The first problem I had was with getting a nice first layer down. It really was a matter of luck whether this was going to work or not. I knew I had to get the Z-Offset right and I also knew that I needed to probe the bed prior to printing to get the woefully unlevel bed of the Tronxy mapped out. But no matter what order I did it in and what calibrations I applied I just couldn’t get it to work. It would either be too high and the filament would not stick to the bed, or it would be too low, causing the print head to crash into the bed causing several issues:
- The filament would sometimes jam
- If it didn’t jam it would be stuck to the bed like it was superglued and need a heat gun and acetone to remove
- The print head scraping on the bed would wear causing the tip to enlarge
- It would scratch the bed quite badly (fortunately the tempered glass bed is super durable)
I finally figured out that my Z-Offset was just not working as I expected it to and so I had to change my game plan. Up until this point, I would apply my Z-Offset manually using the CALIBRATE_PROBE command then I would send my GCODE file to the printer with the following start GCODE to map out the bed:
BED_MESH_CLEAR
BED_MESH_CALIBRATE
From here there was nothing I could do but wait and watch, which more often than not did not end well.
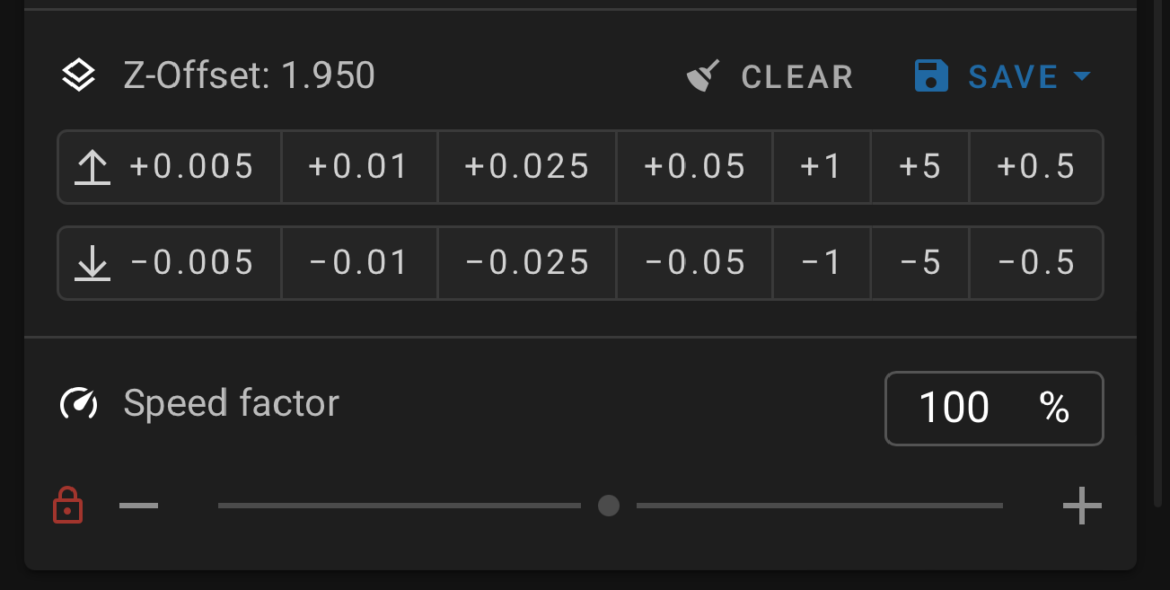
One of the features of the Klipper firmware is that it allows for a live Z-Offset adjustment. What this means is that if the Z-Offset is out, I can actually adjust it while it’s printing. This is a real game changer for me, because I can now monitor the print for the first few minutes while it’s putting down the first layer and make adjustments as it goes.

One of the reasons I hadn’t thought of this earlier is because I need to map the bed each time before I start a print. Being a 600 x 600mm bed, it’s not a quick process as it maps out over an 8×8 grid. Probing 64 points on the bed takes a good 5 minutes and that’s after the bed and extruder are warmed up. So it takes 10-20 minutes to start printing my files and get to a point where I would be able to make the live Z adjustments.
This is obviously not a good way to work this.

The new game plan
The issue of having to wait around for my print to start and monitor needed to change. It just wasn’t going to be practical. I need it to print on my terms when I’m ready for it. There were 2 ways I could achieve this:
- Create a GCODE file that gets the printer to temp and probes the bed.
- Create a preset in the Temperature UI that gets the printer to temp and probes the bed.
It’s really just 2 ways to achieve the same thing. I went with the preset method mainly because I discovered it in the UI and hadn’t considered creating a GCODE file at the time. I may change this to GCODE files in the future so that I can have a suite of GCODE files ready for different types of filament.
To create the preset I did the following:
- Go into UI Settings in Mainsail
- Navigate to the Presets tab

- Click add preset
- Create a new preset with the following settings:
Extruder: 230
Heater Bed: 60
Custom G-Code:G28 ;home all axesG1 Z5 F5000 ;lift nozzleBED_MESH_CLEAR ;clear any mesh that may be saved to printer.cfg BED_MESH_CALIBRATE ;probe the bed to create a new mesh - It should look something like this

Before I print I run this preset to get everything ready for me. The printer is now primed and waiting for its next command (or GCODE file). I’m now able to walk away from the printer and return when I’m ready. I then start the print and watch the head and the first layer closely. I always print with a brim of 3-4 loops that I use for sacrificial testing purposes ensuring the filament is going down nice an even. If the head looks like it’s scraping I raise it usually by +1mm to start with as if it’s scraping it probably pushing down into the bed more than it appears. If it’s too high I lower it by -0.5mm or whatever I feel is appropriate. I’ll make adjustment and watch it for a while. NOTE, that the live Z adjustment doesn’t start until the next GCode command is issued so changes don’t happen immediately.
Once I’m happy with it I stop fiddling and let the printer do its thing.